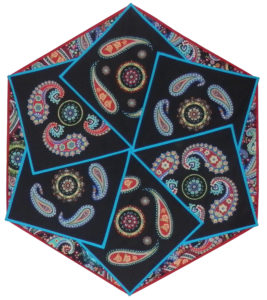
 I’ve had a lot of inquiries about how I put my McCall’s Quilting Challenge 2 quilt together and also a request to see a more detailed version. Ask and you shall receive!
I started with the six black fabric squares, which were 12″ x 12″. I fussy cut the motifs from the featured fabric. I cut them out about a half inch larger all around the fussy cut, and applied fusible to each piece. I then trimmed them down along the edge of each motif. This was a real test for my eyes! The edges of each of the motifs have very small ins and outs. While I was tempted to just cut straight across the motifs, I was happy that I took the time and made the effort to be more precise. I then laid out the motifs on each of the blocks.
Once I had a general idea of where I wanted everything to go, there were a few additional fussy cut pieces I had to do. For example, some of the paisleys went to the left and some to the right, including some that were the same in color and size. I wanted each set of paisleys on a square to go the same way, so I had to tinker with it a bit. I also wanted the opposite blocks to match, or at least be similar, both in the paisleys and the center circles.
After getting all the right pieces in all the right places, I had to figure out the angle that I needed for each of the squares to overlap equally (six squares times thirty degrees equals 180 degrees!) and mark that angle on each square so I would know the area I had to work with. After marking there was some fine tuning and I was finally ready to fuse the pieces in place.
With fusing complete, I had to add the blue edging to the squares. Although I had thought I would do something similar to binding, I found sewing inch wide strips on and then mitering the corners was a better idea. I folded the strips to the backside of the square and used 1/4″ Steam a Seam II to fuse them down. I can see I’ll be using that product again. It was great to work with.
To complete the piece, I measured the triangles that I needed to create in the paisley fabric to turn the star into a hexagon. Once they were cut, I created the red bias strips on the long side of each triangle and fused it in place. The final step was to fuse the squares to the triangles. Since this could not be quilted for the contest, I had to wait until after it was submitted and accepted before I quilted it.
I haven’t yet gotten to quilt it, but I will in the next few weeks. I’m hoping to enter it in my local quilt show next spring and plan to do echo quilting around each of the fussy cut pieces to make them pop even more.
I’m glad you all are enjoying this piece, and I want to thank you for voting for it and for all of your support!