Which Log Cabin setting is your favorite?

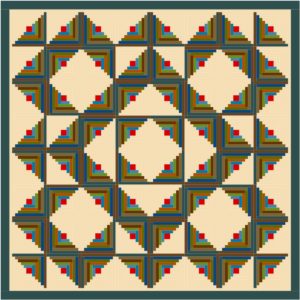
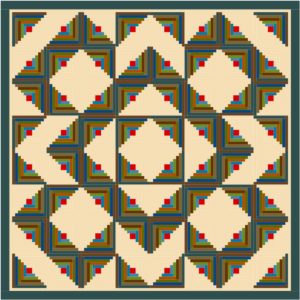
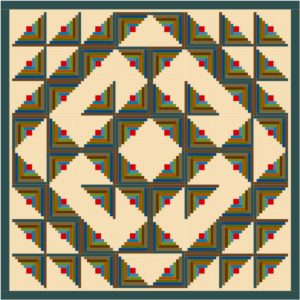
I’ve been working on a king size log cabin quilt for several months, which you can interpret as anywhere from three months to a year and three months. I’ve narrowed down the settings for the blocks, and I could use your input as I make my selection. Here they are, from the classics to the “thinking outside the box” versions.

Leave me a comment with your choice and a reason why you like it, and I’ll pick one name from among you to win a prize. Yes, there is fabric involved. The deadline is Friday, September 15, at 5 pm.

Thank you!

Option #1
Option #2
Option #3
Option #4
Option #5
Option #6
Option #7
Option #8

Quilting Days = Happy Days

There’s no doubt that creativity ebbs and flows; some days you’re feeling it and some days you’re not. Hopefully the days you are feeling it coincide with the days when you have time to devote to your passion. If you’ve planned well ahead you’ll have the setting and supplies to get at it.

HeartSome of my favorite quilting days are those I spend with my quilting buddies. Over the last few years we’ve tried to get together once a month to spend some time catching up while we work on our latest projects. It’s not always easy to find the time but when we do, it always makes for a happy day.

It’s not necessarily because we are making huge creative strides; in fact, it’s usually quite the opposite. We each seem to bring a project that won’t require our creative attention; rather we’re getting work done that supports our creativity. For me this often means endless chain piecing. The longer the chain the better! Others work on hand binding, pressing, or putting together a block of the month, which usually needs to be finished for the following Saturday. There’s also a fair amount of show and tell that goes on, complete with lots of ooohs and aaahs.

As we sit and work, we’re always catching up on the latest in our lives. There’s our professional lives to chat about, quilt industry news (did you see the new “fill in the blank”? I have to get it!), new methods one or another of us may have picked up, etc., but mostly we talk about our families. What’s the latest with each of their kids? The joys of being a grandma. The funny thing a husband did. The lovely thing a husband did. Plans for vacations. Plans for house remodels. Plans for retirement.

We’ve been lucky that over the last several years we’ve been back to the quilting retreat where I met these lovely ladies. In fact, we’ve been back too many times for me to count.

They are my closest friends, and, in many ways, family.

And so Quilting Days = Happy Days.

Sauder Village Quilt Show Awards Dinner

Last night was the Sauder Village Quilt Show Awards Dinner, held at the Heritage Inn at Sauder Village. It was a really fun evening, featuring a talk and trunk show by Bill Kerr, this year’s guest teacher. It was not just interesting; we were able to see (and touch) his quilts. Bill and his wife, Weeks Ringle, of Modern Quilt Studio, collaborate on their quilts and we were given a peek into the process they use to come up with ideas and see the quilts through to completion. It’s always inspiring to see and hear from other quilters (in this case artists!) and I’m always influenced in one way or another.

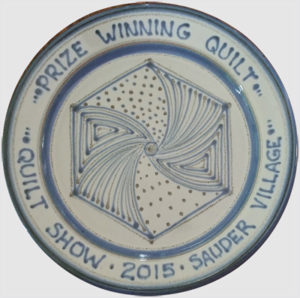
Sauder Village Quilt Show 2015 Prior to Bill’s presentation there was a slideshow of the winning quilts and first place winners were each presented with a plate made by the Sauder Village potter – Mark Nafziger. Each year Mark designs a plate for the winners; this year he has based the center design on a Modern Quilt Studio design.

To say I’m thrilled to have one of these plates is an understatement! It will have a place of pride in my quilt studio. When I get frustrated with a particular design I can look to it as a reminder that hard work pays off.

I’ll be going back to the show tomorrow for one more look and to pick up my quilt, and I’ll look forward to seeing all the beautiful quilts at next year’s show. Check the Sauder Village website for more details on the 2016 Quilt Show.

Pineapple Delight


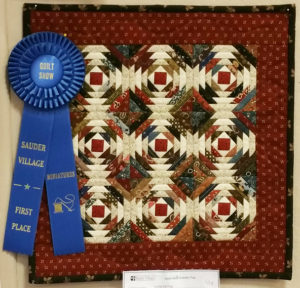
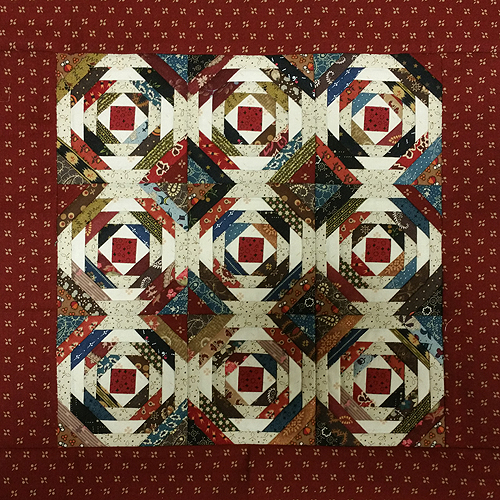
Pineapple DelightI’m so pleased that my miniature pineapple won first place at the Sauder Village Quilt Show. It was unexpected and a thrill! Pineapple Delight is 14 1/2″ x 14 1/2″ and was foundation paper pieced. It was pieced with #aurifil 50 wt. cotton thread. It kept my seams bulk-free and gave me the precision I wanted.

Every quilt has a story and here is this one’s: “Knowing that I enjoy working on small blocks, my friend and quilting buddy Kathy Clark challenged me to create this miniature pineapple quilt. The kit Kathy gave me called for making either three or five inch foundation paper pieced blocks; I chose to go with three and a half inch blocks instead. Pineapple Delight, to my mind, contains all the best things about quilting: it was a gift from a quilting friend; it challenged me to take my skills to another level; it is scrappy and traditional; and I made it at the Sauder Village Quilt Retreat, where I met Kathy several years ago.”

I did a quick once around the show tonight and there are so many lovely quilts to see. If you’re in the northwest Ohio area it’s a must see! I’m looking forward to spending more time at the show later this week.

Art Classes and Quilting

Mt. Monadnock

Recently I had the opportunity to attend an hour and a half long class in creating landscapes with pastels. I wondered how much I could learn in that brief amount of time.

I brought a landscape photo with me to work from, and although my drawing looks nothing like my photo it’s still a nice drawing that I may actually mat and hang.

It turns out that the great value in attending the class was the chance to exercise my creative muscles. My obsession with quilting is great and a lot of fun, but every once in a while it’s great to be creative in some other way.

Mt. Monadnock Pastel

For me it reminded me of several quilting projects I had in mind and hadn’t yet started, and it got my brain thinking about quilting in slightly different ways.

I think of it as adding another layer of creative juices to the blender.

Dabble in another art form and enjoy the results!

Quilt As You Go (QAYG) – is it for you?

For most of us who quilt on our home machines, a quilt any larger than twin size is difficult to manage on our sewing machines. There are many excellent quilting books out there and they will tell you how to deal with a large quilt, but for me about the best I could do with a large quilt is stitch in the ditch or SID. Many quilters quilt by check, paying a longarm quilter to quilt their top for them. Others quilt by hand, something I’ve tried and loved, but that can take forever, especially with a large quilt. These aren’t options for everyone, and that’s where “quilt as you go”, or QAYG comes in.

With a queen or king size quilt, it is much easier to quilt in smaller, more manageable pieces. You can quilt your quilt row by row or even block by block and then use your sashing to assemble the quilt. This is known as quilt as you go.

There are several methods out there and most of them will have you first quilt your blocks or rows. In some methods, you then attach your sashing on the front and back of each section. You will then sew the blocks or rows together (by machine) on the front only. Once the front is all together you’ll go back and hand sew the remaining sashing on the back of the quilt.
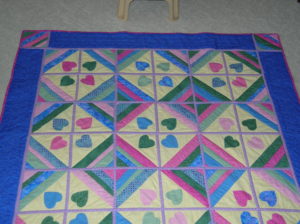
Jessica's QuiltI have made a quilt this way, using the book Reversible Quilts: Two at a Time by Sharon Pederson. It’s a nice method as Ms. Pederson also shows you how to make blocks that will look good on the back as well.

I recently made a baby quilt which was five blocks by five blocks. To use quilt as you go for that quilt I prepared my blocks and layered my batting and backing. I determined the center row of the quilt, lined up the first two blocks in the row, laid them right sides together on top of the batting and backing, and sewed the seam that joined them. I then flipped the top block to its right side, lined up the next block in the same manner and continued through that row.

For the rest of the rows I assembled the rows first. I took the row next to the center row and put it right sides together atop the center row, sewed the seam and flipped it up. I added the remaining rows in the same way. The disadvantage to doing it this way is that you do have to go back and do further quilting, either stitching in the ditch or using other quilting patterns. Once you’ve got the center done you can add your borders in the same way.

There are other methods out there, notably Marti Michell’s book Machine Quilting in Sections and Betty Cotton’s Cotton Theory Quilting. They have stood the test of time and if you’ve struggled with quilting large quilts, you should give them a try. Turn those quilt tops into quilts!

Half Square Triangles (HSTs) and Quarter Square Triangles (QSTs): What’s the difference?

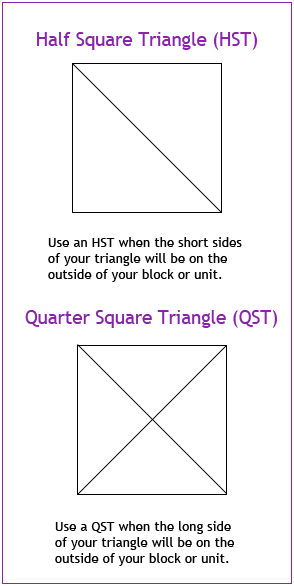
I’ve been asked to repost my explanation of the difference between Half Square Triangles and Quarter Square Triangles. Here it is:Half Square Triangles - Quarter Square Triangles

Half square and quarter square triangles differ in several key ways. At the most basic level, they differ in the number of times you cut the square diagonally. A half square triangle is cut only once; a quarter square triangle is cut diagonally twice.

How many times you cut the square not only affects the size of the triangle but also determines where the bias edges of the triangle will be. When you cut a square in half, the two sides that form the right angle of the resulting triangle (the short sides) are on the grain line. When you cut a square in quarters the only side on the grain line is the long side opposite the right angle.

Why are grain lines and bias edges so important? When piecing you want to make sure that the sides of your blocks and block units are not made up of bias edges. If they are “on the bias”, your block may stretch and you won’t get the precision you are looking for.

To make each, take the finished size of the square you want and add:

for half square triangles, add 7/8″;
for quarter square triangles, add 1 1/4″.

If you want a four inch finished HST, start with two 4 7/8″ squares. If you want a four inch finished QST, start with two 5 1/4″ squares.

Many quilters start with larger squares and trim down the finished unit to the proper size. For example, if they want a three inch finished HST, they will start with two four inch squares, instead of two 3 7/8″ squares. Do whatever gives you the most accurate finished product.

Just another note on terminology: each triangle is called either a half square triangle or a quarter square triangle. When you sew two half square triangles together, you get a triangle square. When you sew four quarter square triangles together, it is often called a quarter square triangle unit or an hour glass unit.

Hope this helps!

What I did on my summer vacation

Yes, it has been a while since our temperatures were anywhere near summer-like. Let’s just say that due to unforeseen circumstances, my summer was extended a little past late September and right on through October. And here it is November. It’s never too late to write that back-to-school essay.

I had an exciting summer and it included being chosen, along with two other quilters, as a winner of Arrow Sewing Cabinets Banish the Blah contest. Arrow, which makes both Arrow and Kangaroo cabinets, was in need of three quilts to decorate their offices, and offered prize money toward the cabinet of your choice as a prize. Banish the BlahNaturally, having the expensive taste that I do, I selected their Dingo Cutting and Storage Cabinet as my prize. It goes so well with my Aussie cabinet and my Joey storage drawers. I think my quilt studio is now complete! I can highly recommend all of Arrow’s sewing furniture; it’s sturdy, beautiful and well-designed. I especially like that my pieces fold into fairly compact pieces that look like fine furniture.

The design I submitted to Arrow was the same as my Diamonds & Rust prize winner, but made in Arrow’s size and color requirements. It was a lot of fun making the quilt, even with my unforeseen circumstances causing delays in getting the quilt done. I just made the deadline, and I am honored that the quilt is now hanging in Arrow’s offices.

In addition to the prize winner, it was my summer to finish up projects. It feels so great to finally finish projects that have been sitting around waiting for that last little detail to be completed, and get them to their rightful owners. Several of these quilts will be patterned in the near future, so you’ll have to wait for pictures until the patterns are released.

I undertook a major reorganization of my quilt studio, and as I write this I’m sitting at my garage sale and meeting many area quilters who have come for a bargain. I’ll soon be putting the remainder of the items (mostly yardage) online for you all to peruse. I’ll add a few new goodies in as well! Look for a post here soon!

I’m looking forward to the January retreat at Sauder Village, sponsored by their fabulous quilt shop, Threads of Tradition. If you’re ever in northwest Ohio, the shop and the Village are a must see. I enjoy the retreat so much I’ll be going back in March for another one.

Watch for my online yard sale post for some excellent bargains!